Dead LG 32LX2R-ZE LCD TV Repair

I was given one of these TVs to have a quick look at and found that there is a common power supply fault. This particular TV was dead, no sound or display and no standby light. Although inspecting the capacitors found no leakage or bulges, the power supply develops a fault and is easy repairable by simply replacing the faulty capacitors.  The capacitors can be bought in repair kit form from donberg electronics or even on ebay. I needed the caps the same day so I picked them up from the local maplins.  The easiest way to fix is to simply replace all of the caps that can be affected by the fault.

The 14x components needed are:

1000uf 10v x3

2200uf 10v x1

1000uf 25v x2

680uf 25v x2

100uf 50v x2

1000uf 35v x4

I couldn’t get any of the 1000uf 10v at maplins so I substituted these for 16v and the same with the 680uf 25v so I used 1000uf 25v in place.

The caps are all located in the same area on the PSU:

This fault appears on several different models:

26LX1R
26LX2R
32LP1R
32LX2R
MW30LZ

REMEMBER! Electrolytic capacitors have a positive and a negative electrode.(Polarised) This means that it is very important which way round they are connected. Connect them the wrong way and BOOM!

Posted in TV Repairs | 33 Comments

Toshiba A100 series laptop bios password

A few Toshiba BIOS versions have a bug that causes the password to be changed / set at startup randomly. This guide will show you how to remove the password from A100 series (A105 etc) laptops easily.

First we need to remove the keyboard from the laptop. There are usually a couple of screws on the underside but this varies from model to model, or there is sometimes a straight plastic strip that runs the whole width of the laptop, approx. 1cm wide, just above the keyboard. If this is the case it simply clips off to reveal a couple of screws holding the keyboard down. Either way the keyboard will need to be removed, guides to do this are available all over the internet for different models and shouldn’t be too dificult to find.

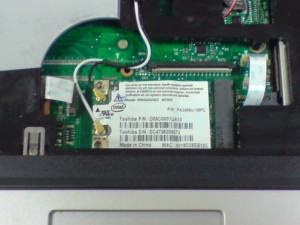
After removing the keyboard you should be able see a wifi card that just clips out.

Remove this card, making a note which way the 2x wifi antenna wires are connected.

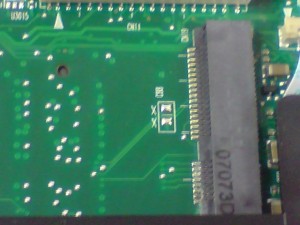
Under the card you should see a marking on the board C88, with 2x solder pads.  I apologise for the bad photo, the focus was out 🙂

Now all you have to do is remove the laptop battery, connect the 2x jumper points with XX next to them and boot up the laptop until it gets past the startup password request screen. You can connect these with  a paper clip (rubbed down to remove any plastic covering), small pliers or simply solder a small wire like I did. Be careful not to touch any other parts, we dont want to short anything out do we…..

After it’s booted you password will be gone. It may be a good idea to update to the latest BIOS available on Toshiba’s web site (make sure you get the right one) to stop this fault happening again.

Posted in Passwords | Leave a comment

Basic Diode fault finding

If you are working on a faulty Laptop or similar with an external power supply, you may find that the PSU trips out when connected to the power socket. This can be caused by many things, but a suspect diode is usually a favourite of mine. Maybe this information might help.


With a diode, electricity flows into the “cathode” (negative side) of the diode and then out the “anode” (positive side toward the protected circuit. Diode’s are primarily used to protect delicate components in an integrated circuit such as a power supply or mainboard. A diode will only permit electricity to flow in one direction, potentially protecting components such as a power regulator IC from power spikes, over voltage or even polarity reversal. Although there are several types of diodes (Zener/rectifier/LED etc) the following information is aimed at standard glass diodes or similar. To test a diode it must be removed from circuit or at least one end lifted from the board. Connect your multimeter and check that you get a reading in ONE direction only. If you get continuity in both directions (reverse the meter probes to check each direction) then you have a bad diode. It is sometimes possible to actually see a broken diode using a magnifying glass. Removal of a diode in some cases will “fix” the faulty device. This is not recomended as the diode is there to protect the circuit and sometimes simply removing it will render the device unsafe – anti smoke & fire!

On the board a diode is usually marked with a screen printed “glyph”:

This features a vertical line that represents the cathode (negative) and a arrow that points to this line. The cathode must face the the negative current flow on the board. The new diode will have a band or dot printed on the cathode end. If you are not sure you can easily find the polarity using a multimeter. Set the meter to Ohms, hold the black probe to one end and the red to another. If you get no reading or just 1 (on a digital multimeter) then reverse the probes. When you get an actual reading, note that the black probe is in contact to the cathode (negative) side of the diode.
(Remember if you get continuity in both directions, the diode is blown)

Posted in Electronics | Leave a comment

Acer Aspire One Blank Screen Easy Fix

The Acer Aspire One has a fairly common fault – power on but no display.  This is caused by a bios corruption or similar. Acer have very kindly added a built in BIOS recovery routine, that makes it a doddle to fix! It works by booting into a minimum Bios environment by accessing a hidden boot block that will allow you to re-flash the Bios. This will work even if the laptop wont POST – otherwise known as crisis recovery.

All you need is 1x USB pen  (formatted with the FAT filesystem).

Download this zip file and extract the FLASHIT.EXE and ZG5IA32.FD files onto the fomatted USB pen.

Please note – this USB Pen does NOT need to be bootable.

Turn your Aspire One off, and make sure both battery and AC adapter are plugged in. Plug the USB pen into the side.

Press Fn and Esc simultaneously, keep them pressed and press the power button. You may release Fn+Esc after a few seconds. The power button starts blinking at this point, press it once. The Aspire One will now access the files on the flash drive and initiate flashing the BIOS. After a while the power button stops blinking, and will reboot by itself.  Don’t unplug the Aspire One or try to turn off at this point, it may take a couple of minutes.

If this dosen’t fix your Aspire One, you may have a later BIOS. Simply download the latest BIOS file from Acer’s web site, rename it to ZG5IA32.FD (it will only work with this name) and try again.

Posted in PC Repairs | Leave a comment

Sony Vaio VGN-SZ Series

Sony Vaio VGN-SZ Service Manual

Posted in Service Manuals, Sony Laptop | Leave a comment

Sony Vaio VGN-T Series

Sony Vaio VGN-T Service Manual

Posted in Service Manuals, Sony Laptop | Leave a comment

Sony Vaio VGN-TX Series

Sony Vaio VGN-TX Service Manual

Posted in Service Manuals, Sony Laptop | Leave a comment

Sony Vaio VGN-X505 Series

Sony Vaio VGN-X505 Service Manual

Posted in Service Manuals, Sony Laptop | Leave a comment

Asus EEEPC 4G (701)

Asus Eee PC 4G Service manual (zipped)

Posted in Asus Laptop | Leave a comment

Compaq C700

Compaq / Compal C700 Service Manual

Posted in Service Manuals | Leave a comment